Tutorial: Create a Pipeline
This tutorial is designed to help you understand how to create a simple pipeline. We will step through each field and describe exactly what type of information is required.
Simple Scenario
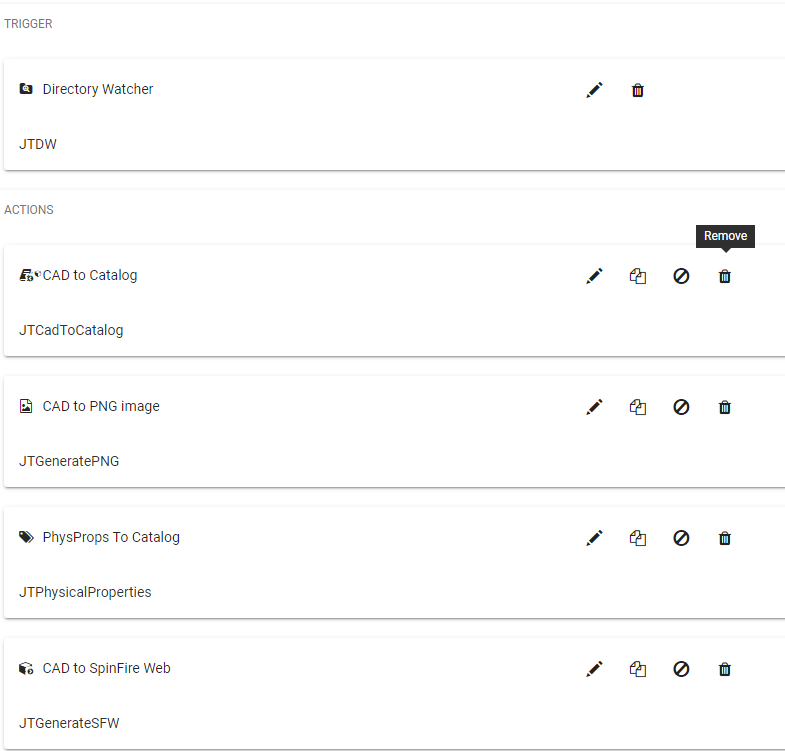
We want to create a simple ACT3D publisher pipeline that uploads files to the Catalog and includes the following processes:
- Watch the folder, C:\CAD, and its subfolders.
- Publish SpinFire ACT3D files.
- Upload the files to the Catalog.
- Convert the files to STEP format and store them in the Catalog.
Assumptions
- The original CAD file is uploaded to the Catalog.
- A thumbnail is needed and is uploaded to the Catalog.
- The local copy of the newly created file is removed from the local drive.
- The newly created file is written to the C:\out folder.
Steps
- Click Create New.
- Enter a meaningful Pipeline name and Description.
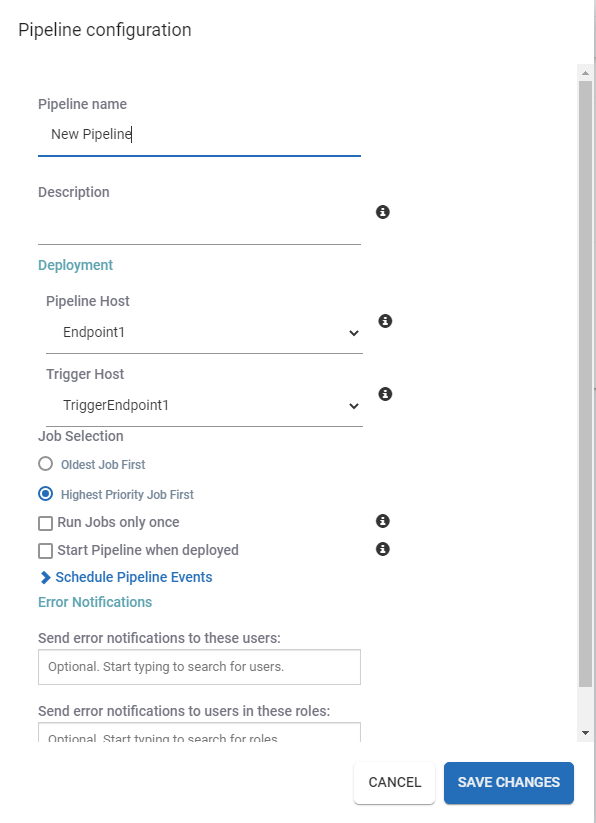
- Enter the maximum number of jobs that can run concurrently (i.e., the number of files processed simultaneously). Four is the default value.
- The endpoints are not changeable.
- Select the job priority. Oldest Job First is the default.
The job priority can be changed in the Job Explorer. - Click Save changes.
In our simple scenario, the CAD files are located on the local drive; select the Directory Watcher trigger.
- Drag the Directory Watcher trigger into the trigger section of the pipeline.
- Enter a trigger name.
Note: The trigger name is used as a prefix for all action dynamic fields. I like the dynamic fields to be somewhat concise so I'll keep the trigger name short, calling it "dw."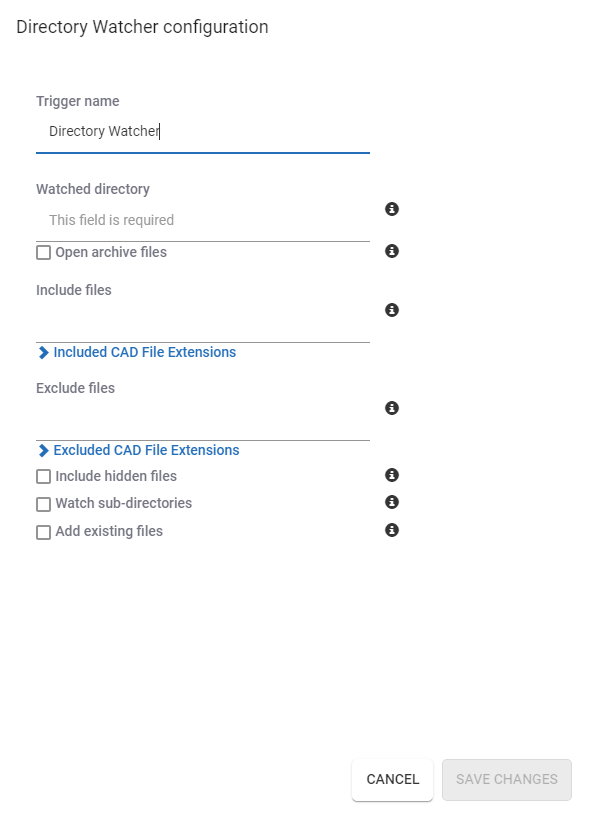
- Enter the Watched directory. (In this scenario, it will be C:\CAD.)
- Enter the include files and/or click Included CAD File Extensions and make a selection. For simplicity, expand the file extensions list and click the Toggle All button.
- There are no Exclude files so this field remains blank.
- Select the Watch sub-directories checkbox.
- Select the Add existing files checkbox.
- Click Save changes.
A Catalog Part is essentially the entry in the Catalog. The Catalog Part must exist in order to upload resources/files to the Catalog.
The Catalog Part can be thought of as a container in the Catalog. We'll fill this container with the associated files. In this case, it will be the CAD file itself, the thumbnail, the ACT3D file, and the converted STEP file.
We'll use the name of the CAD file as the name of this container or Part.
- Drag the CAD to Catalog action to the Actions section.
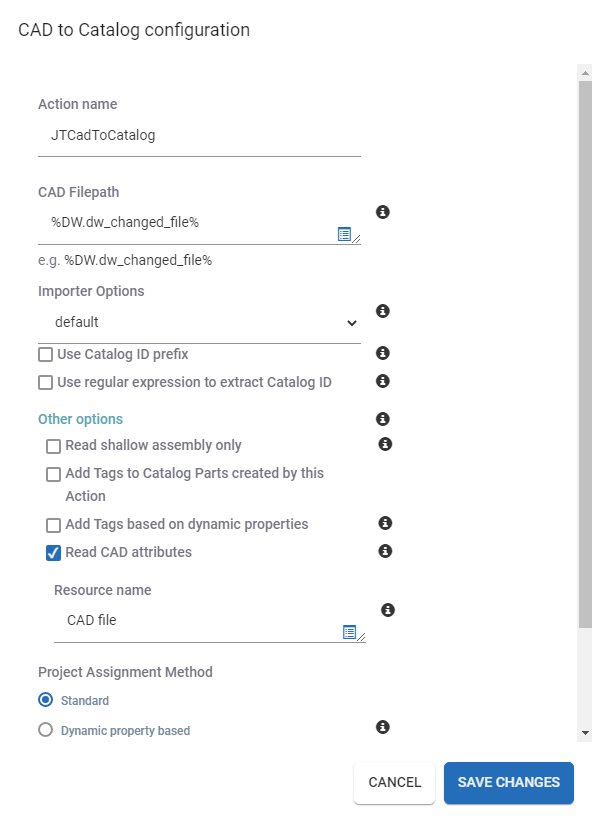
- Enter a meaningful Action name.
- The CAD Filepath must be the complete path and file name of the file currently being worked on.
Since the pipeline definition is generic, we don't know what the file path and name is at this point. You could enter a specific path and file but then the pipeline would operate only on that one file. We need a variable that represents all the various files that are queued up during the pipeline execution. This is where Dynamic Properties are used.
A Dynamic Property is replaced by its value; the value in this case is the current file being worked on.
The dynamic property that represents the path and name of the current file being processed is:
%dw.dw_changed_file%
where the initial "dw" is the name of the directory watcher trigger defined earlier.
Select %dw.dw_changed_file% from the list. - Select Use filename as Part Number under Part Numbering.
This means that the filename will be used to represent the part moving forward. This is important because:- This is how the part will be named in the Catalog.
- Actions—especially uploading to the Catalog—require that the part be referred to using this naming convention.
- For the other options, we'll select Read CAD attributes but not Read shallow assembly only.
The CAD attributes will be stored in the Part under the CAD tab if they exist in the CAD file.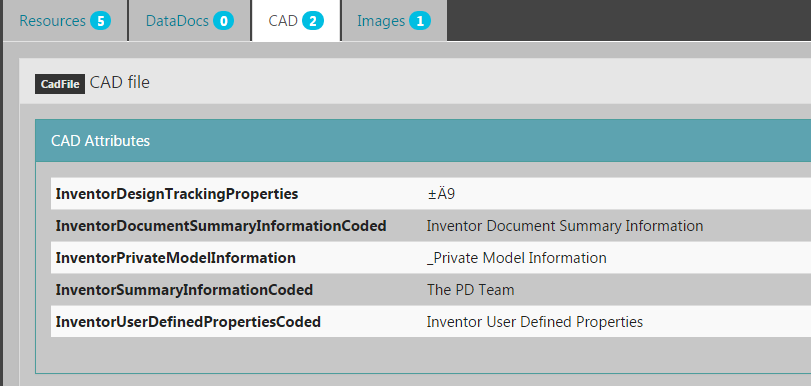
- Enter the Resource name, "CAD file." This is the name that will appear on the Resources tab in the Catalog.
- Select DefaultProject as the project.
- Enter username and password user Credentials.
- Click Save changes.
Now that our part has been created, let's load it up with files. To upload any file or resource to the Catalog we'll use the Resource to Catalog action.
- Drag the Resource to Catalog action to the Actions list.
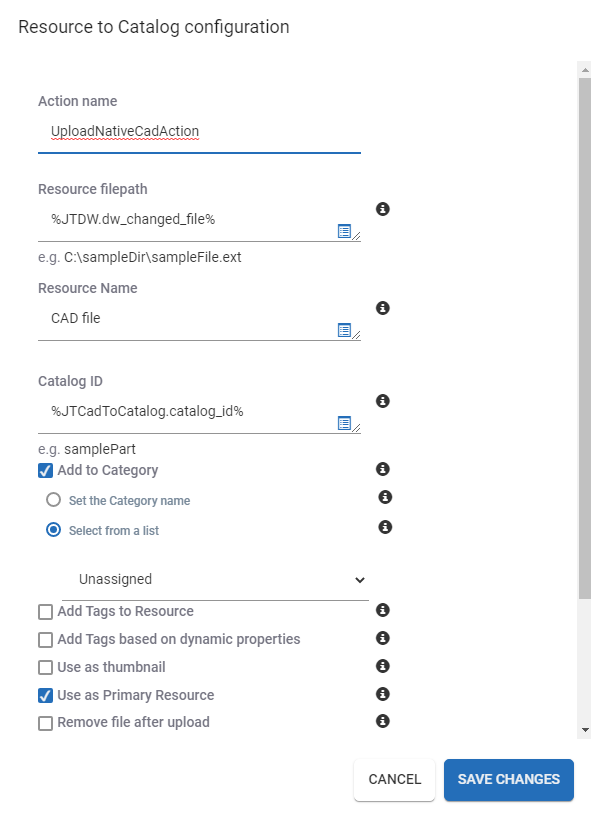
- Enter an appropriate Action name.
- Enter the Resource filepath. This is the location and file name of the CAD file being uploaded. As we already know from the previous action, this will be a dynamic property. Use the dynamic property, "%dw.dw_changed_file%."
- Enter the Resource Name. This is the resource that will appear on the Resource tab for this file. In this case, we enter "CAD File."
- The Resource Type is a CAD file.
- The Part Filepath is the name of the part in the Catalog. We used the file path and file name to name it. Use the dynamic property, "%dw.dw_changed_file%."
- Click Save changes.
Now, to convert the CAD file to an ACT3D file:
- Drag the CAD to SpinFire action to the Actions list.
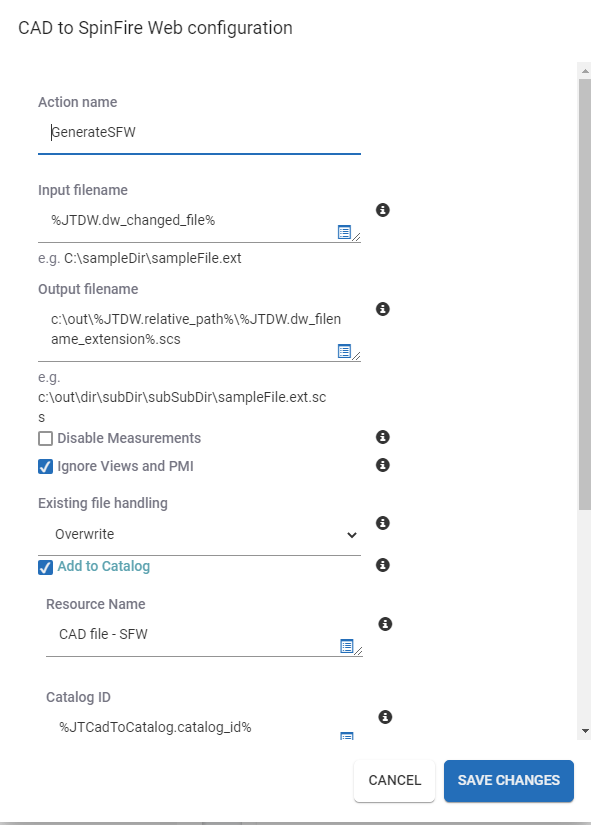
- Enter an Action name.
- Enter the CAD filepath. This is the location and name of the CAD file to be converted. Use the dynamic property, "%dw.dw_changed_file%."
Enter the Target filepath. This is the path and name of the file to be generated.
We'll use the folder, "C:\Out\," as the location for the ACT3D file. We also want to create the ACT3D file in a subfolder location relative to its source. We'll use the original CAD file name as part of the ACT3D filename.
To do this, we combine some text with a couple of dynamic properties to build the path and file name.
To get the relative path of the original CAD file we use the dynamic property, "%dw.relative_path%."
Also, we want to use just the file name and extension so we use the dynamic property, "%dw.dw_filename_extension%."
We also need to provide the ACT3D extension for our final ACT3D file name.
We want to concatenate all our elements of "C:\out\" + %dw.relative_path%" + "\" + "%dw.dw_filename_extension%" + ".ACT3D."
For example, if our original file is found at "C:\CAD\NX\Test1\ORing.prt," the dynamic properties appear as follows:Dynamic Property Value %dw.relative_path% NX\Test1 %dw.dw_filename_extension% ORing.prt And our final text looks like this:
C:\out\NX\Test1\ORing.prt.ACT3D
Enter "C:\out\%dw.relative_path%\%dw.dw_filename_extension%.ACT3D."
(Note that the folder separators ("\") need to be inserted to make a valid path.)- Leave the Exist file handling as Overwrite.
- Click Conversion options and make your selections.
- Click Save changes.
Now that the ACT3D file has been created, we need to upload it to the Catalog (a process similar to uploading the CAD file in step #4).
- Drag the Resource to Catalog action to the Actions list.
- Enter an Action name.
- Enter the Resource filepath which is going to be the location and name of the ACT3D file. This will be the same value as was entered in the Target filepath in #4 of step 5.
C:\out\%dw.relative_path%\%dw.dw_filename_extension%.ACT3D - Next enter a Resource Name. This can be anything.
- Select Other file as the Resource Type.
- Again the Part Filepath is the Catalog part name. Use %dw.dw_changed_file%.
- Enter the appropriate Credentials.
- Click Save Changes.
We need to create a PNG file and assign it to the Catalog part as the representative thumbnail.
- Drag the CAD to PNG image action to the Actions list.
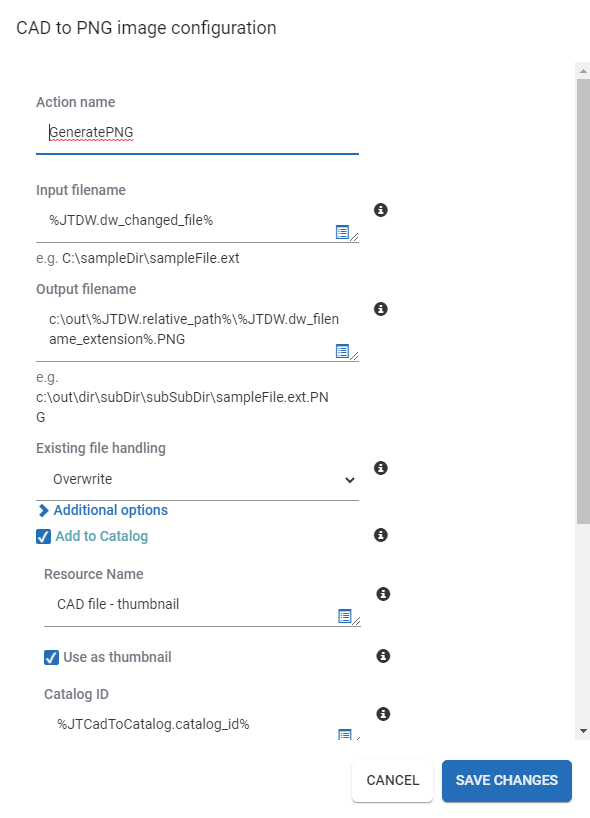
- Enter an Action name.
- The Input Filename is the CAD file so enter the dynamic property, %dw.dw_changed_file%.
- For the Output filename, let's again create the PNG file in the c:\out folder but with the relative folder structure.
Enter c:\out\%dw.relative_path%\%dw.dw_filename_extension%.PNG into this field. - Leave the Existing file handling to Overwrite.
- Click Save changes.
Let's upload the image (PNG) as the thumbnail to the Catalog part..
- Drag the Resource to Catalog action to the Actions list.

- Enter an Action name.
- Enter the Resource filepath which is going to be the location and name of the PNG file.
This will be the same value as was enter in the Target filepath from the step creating the PNG file.
So enter C:\out\%dw.relative_path%\%dw.dw_filename_extension%.PNG. - Next enter a Resource Name. Use "Thumbnail" as the Resource Name..
- Select Image file as the Resource Type.
- Check the Use as thumbnail check box.
- The Part Filepath is the Catalog part name so use, %dw.dw_changed_file%..
- Enter the appropriate Credentials.
- Click Save Changes.
Finally, we'll convert the original CAD file to the STEP CAD file format.
- Drag the CAD2CAD Conversion action to the Actions list.

- Enter an Action name.
- The Input Filename is the CAD file to be converted so enter the dynamic property, %dw.dw_changed_file%.
- We'll skip the Default output directory and Default output filename fields.
- Set the Existing file handling field to Overwrite.
- Check the STEP check box.
- In the Custom output filepath field, enter c:\out\%dw.relative_path%\%dw.dw_filename_extension%.STEP.
This will output the file in the relative path under the c:\out folder using the original CAD file name with the STEP extension. - Click Save Changes.
Now that the STEP has been created, upload it to the Catalog.
- Drag the Resource to Catalog action to the Actions list.
- Enter an Action name.
- Enter the Resource filepath, which is to be the location and name of the STEP file.
This will be the same value as was entered in the Target filepath from the step creating the STEP file. Enter
C:\out\%dw.relative_path%\%dw.dw_filename_extension%.STEP. - Next, enter a Resource Name. This can be anything.
- Select Other file as the Resource Type.
- The Part Filepath is the Catalog part name. Use %dw.dw_changed_file%.
- Enter the appropriate Credentials.
- Click Save Changes.
Tip
It is common to use an action multiple times within a pipeline such as the Upload to Catalog. It's a good idea to give each action a descriptive name that makes it obvious to know what it does when using it.