
2D Shape Tools
Add and edit 2D shapes in the 2D work space to mark and draw attention to specific portions of your document.
Create a rectangle around information or drawings to highlight them using a transparent or opaque fill.

To create a rectangle:
- Select the Rectangle tool from the 2D toolbar.

- Click a first location to select the start point.
- Click a second location to select the end point.
Create a rounded rectangle around information or drawings to highlight them using a transparent or opaque fill.
To create a rounded rectangle:
- Select the Rounded Rectangle tool from the 2D toolbar.

- Click a first location to select the start point.
- Click a second location to select the end point.
Create a oval around information or drawings to highlight them using a transparent or opaque fill.

To create a oval:
- Select the Oval tool from the 2D toolbar.

- Click a first location to select the start point.
- Click a second location to select the end point.
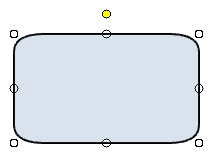
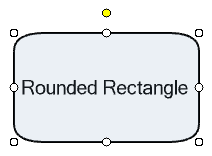
To rotate a shape:
- Left mouse click on the shape to select it.
- White resize grips and a yellow rotation grip should appear.
- Hover the mouse over the yellow rotation grip until it turns red.
- Holding down the left mouse button, drag the rotation grip, rotating the the shape around its center.
- Release the mouse when finished.
To resize a shape:
- Left mouse click on the shape to select it.
- White resize grips and a yellow rotation grip should appear.
- Hover the mouse over one of the white resize grips until it turns red.
- Holding down the left mouse button, drag the resize grip until the desired size its achieved.
Note: top and bottom grips resizes vertically; left and right grips resize horizontally; corner grips resize both vertically and horizontally. - Release the mouse when finished.
To hide a shape:
- Right mouse click the shape.
- Select Hide (shape).
Note: To show:
- Find the shape in the Markups panel.
- Check the associated check box or right mouse click on it and select Show (shape).
To change the shape's border width:
- Right mouse click the shape.
- Hover over Width.
- Select the desired width.
To change the shape's border pattern:
- Right mouse click the shape.
- Hover over Pattern.
- Select the desired pattern.

To change the shape's border color:
- Right mouse click the shape.
- Hover over Line Color.
- Select the desired line color.

Use fill colors to highlight, encode, or simply cover over parts of your drawing.
To change the shape's fill color:
- Right mouse click the shape.
- Hover over Fill Color.
- Select the desired fill color.
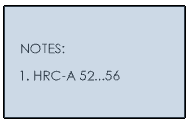
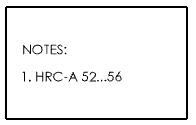
Use the Alpha channel to change the opacity of the fill color.
| Alpha Value | Example |
|---|---|
| 255 |
|
| 200 |
|
| 100 |
|
| 0 |
|
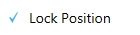
Lock the shape so it cannot be moved unless unlocked
To lock a shape:
- Right mouse click the shape.
- Select Lock Position.
Delete the shape if it is not desired.
To delete a shape:
- Right mouse click the shape.
- Select Delete.

Use Undo to restore a deleted 2D shape.
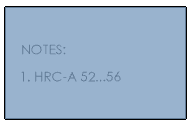
You may want to put text within a shape to label or describe what it's highlighting.
To add/edit text within a shape:
- Right mouseclick the shape.
- Select Properties.
- Edit the Title field.
- Click OK.

Text appears as:
Adding a hyperlink to the shape allows a user to click on the shape to be sent to another location.
To a hyperlink to a shape:
- Right mouse click the shape.
- Select Properties.
- Enter a valid link to the Hyperlink field.

Adding a comment to the shape appears as a tool tip when hovering the mouse over the shape.
To a hyperlink to a shape:
- Right mouse click the shape.
- Select Properties.
- Enter text into the Comments field.


