
CAD Publisher Tutorial: Create a Pipeline
his tutorial is designed to help you understand how to create a simple pipeline. We will step through each field and describe exactly what type of information is required.
Simple Scenario
We want to create a simple ACT3D publisher pipeline that converts files to ACT3D and Step with the following processes:
- Watch the folder, C:\CAD, and its subfolders.
- Publish SpinFire ACT3D files.
- Convert the files to STEP format
Assumptions
- The original CAD file has sufficient read/write permissions.
- The local copy of the newly created file is removed from the local drive.
- The newly created file is written to the C:\out folder.
Steps
- Click Create New.
- Enter a meaningful Pipeline name and Description.

- Enter the maximum number of jobs that can run concurrently (i.e., the number of files processed simultaneously). Four is the default value.
- The endpoints are not changeable.
- Select the job priority. Oldest Job First is the default.
The job priority can be changed in the Job Explorer. - Click Save changes.
In our simple scenario, the CAD files are located on the local drive; select the Directory Watcher trigger.
- Drag the Directory Watcher trigger into the trigger section of the pipeline.
- Enter a trigger name.
Note: The trigger name is used as a prefix for all action dynamic fields. I like the dynamic fields to be somewhat concise so I'll keep the trigger name short, calling it "dw."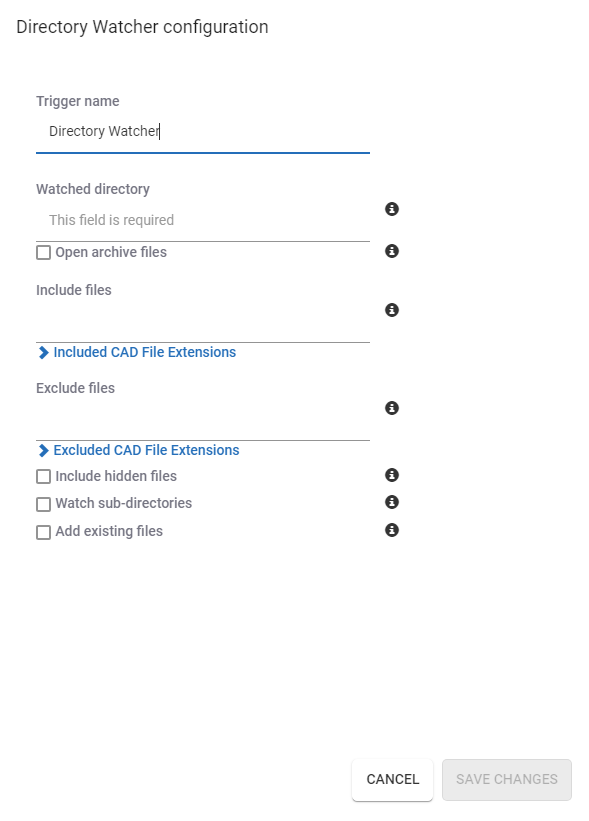
- Enter the Watched directory. (In this scenario, it will be C:\CAD.)
- Enter the include files and/or click Included CAD File Extensions and make a selection. For simplicity, expand the file extensions list and click the Toggle All button.
- There are no Exclude files so this field remains blank.
- Select the Watch sub-directories checkbox.
- Select the Add existing files checkbox.
- Click Save changes.
Now, to convert the CAD file to an ACT3D file:
- Drag the CAD to SpinFire action to the Actions list.

- Enter an Action name.
- Enter the CAD filepath. This is the location and name of the CAD file to be converted. Use the dynamic property, "%dw.dw_changed_file%."
Enter the Target filepath. This is the path and name of the file to be generated.
We'll use the folder, "C:\Out\," as the location for the ACT3D file. We also want to create the ACT3D file in a subfolder location relative to its source. We'll use the original CAD file name as part of the ACT3D filename.
To do this, we combine some text with a couple of dynamic properties to build the path and file name.
To get the relative path of the original CAD file we use the dynamic property, "%dw.relative_path%."
Also, we want to use just the file name and extension so we use the dynamic property, "%dw.dw_filename_extension%."
We also need to provide the ACT3D extension for our final ACT3D file name.
We want to concatenate all our elements of "C:\out\" + %dw.relative_path%" + "\" + "%dw.dw_filename_extension%" + ".ACT3D."
For example, if our original file is found at "C:\CAD\NX\Test1\ORing.prt," the dynamic properties appear as follows:Dynamic Property Value %dw.relative_path% NX\Test1 %dw.dw_filename_extension% ORing.prt And our final text looks like this:
C:\out\NX\Test1\ORing.prt.ACT3D
Enter "C:\out\%dw.relative_path%\%dw.dw_filename_extension%.ACT3D."
(Note that the folder separators ("\") need to be inserted to make a valid path.)- Leave the Exist file handling as Overwrite.
- Click Conversion options and make your selections.
- Click Save changes.
We need to create a PNG file of the CAD Files
- Drag the CAD to PNG image action to the Actions list.

- Enter an Action name.
- The Input Filename is the CAD file so enter the dynamic property, %dw.dw_changed_file%.
- For the Output filename, let's again create the PNG file in the c:\out folder but with the relative folder structure.
Enter c:\out\%dw.relative_path%\%dw.dw_filename_extension%.PNG into this field. - Leave the Existing file handling to Overwrite.
- Click Save changes.
Finally, we'll convert the original CAD file to the STEP CAD file format.
- Drag the CAD2CAD Conversion action to the Actions list.
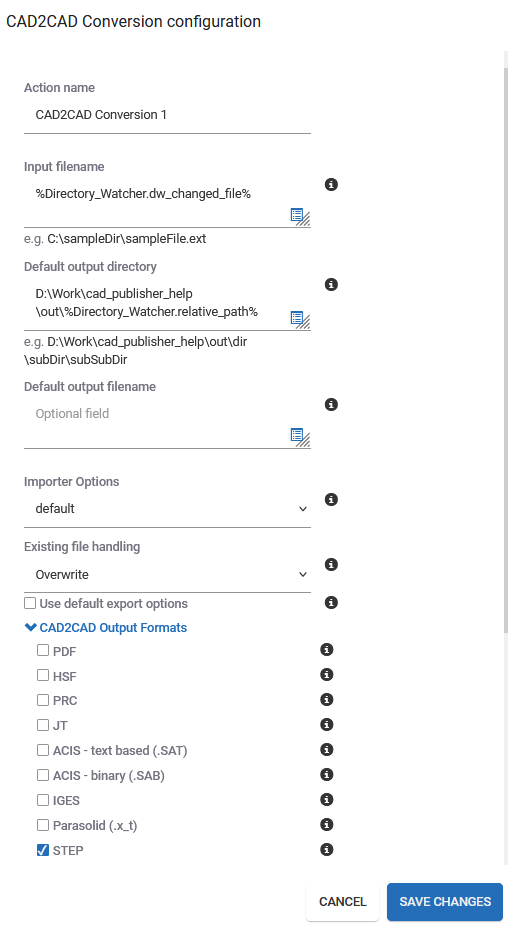
- Enter an Action name.
- The Input Filename is the CAD file to be converted so enter the dynamic property, %dw.dw_changed_file%.
- We'll skip the Default output directory and Default output filename fields.
- Set the Existing file handling field to Overwrite.
- Check the STEP check box.
- In the Custom output filepath field, enter c:\out\%dw.relative_path%\%dw.dw_filename_extension%.STEP.
This will output the file in the relative path under the c:\out folder using the original CAD file name with the STEP extension. - Click Save Changes.
