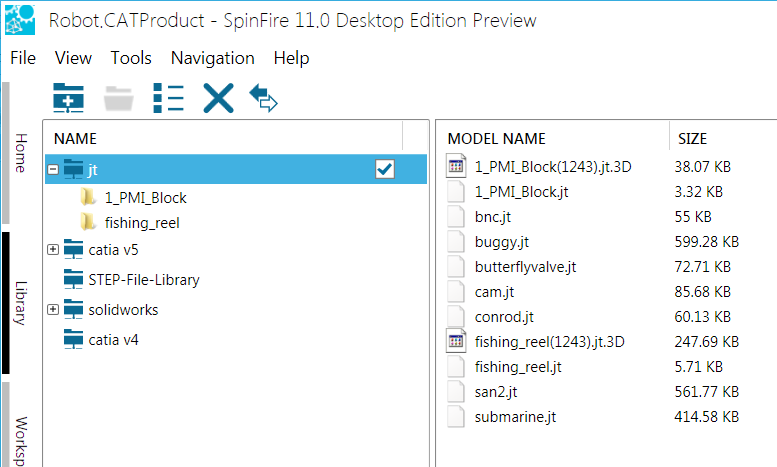
The Library
The Library is a very useful tool for organizing and viewing files—you can set up shortcuts to frequently-used folders, which allows you to search for files in the connected folders, view/change folder and file properties, and open 3D and 2D files in the Workspace.

1. | Library Toolbar - Contains buttons for the following commands: | |
 | Add Connection - Click to add a folder located on your hard drive or network. | |
| Add Centro Connection - Click to add a connection to a Centro 7 project or favorite found in your Centro 7 instance. | |
 | Open - Displays the selected file(s) in the Workspace. Note There are also other ways to open a file: You can select the file, then press Enter or simply double-click it. To open more than one file at a time, select the files, then press Enter. Each file will appear in a separate workspace. | |
 | Properties - If a top-level folder is selected, the Update Connection dialog box is displayed; if a sub-folder is selected, the Folder Properties dialog box is displayed. | |
Use this dialog box to rename the folder and/or to select which file formats are displayed in the file list pane. By default, all files formats are selected.
| ||
| If a file is selected, the File Properties dialog box is displayed. | ||
| ||
 | Delete - Deletes the selected folder or file(s). | |
 | Tiles - Shows thumbnail views of .3D and .ACT3D files. | |
 | Convert - Converts selected files directly from native CAD format to Actify .ACT3D format and other CAD formats. | |
| 2. | Connections Pane - Lists all the connected folders and subfolders you have added to the Library. | |
| 3. | Directory Search Box - Search for connected folders and sub-folders. You can enter all or part of the folder name. | |
| 4. | Converted Files List - Lists files converted from native CAD format to Actify .ACT3D format using the Convert command. (See File Menu Commands and Working with Documents.) | |
5. | File List Pane - Displays a list of the files in the selected folder. What is displayed here depends on what you have specified in the Update Connection dialog box and whether or not the filter checkbox is selected. | |
When you mouseover a top-level folder, a checkbox appears. If selected, the settings (in this case, the default settings) in the Update Connection dialog box determine that only certain files are displayed in the file list pane. If you prefer, you may also turn the filter on/off by using the right-click folder context menu. For lower-level folders, the filter switch is accessible only through the right-click folder context menu.
Clear the checkbox to view the other files in the directory.
SpinFire Ultimate makes it easy to see at a glance which folder is selected and which folder(s) have filtering turned on/off.
The application theme and color is chosen by the user on the Options page—the theme/color on your screen may not be the same as shown here. | ||
| 6. | File Search Box - Search for a particular file within a connected folder or sub-folder. You can enter all or part of the file name. | |