Click the Add Connection button in the Library toolbar to open the Browse For Folder dialog box, which lists your local and network folders.
Navigate through the directory tree and click the folder you want to add.
Click OK.
Note
If you would like to create a new local folder, click the Make New Folder button located at the bottom of the Browse For Folder dialog box.
Remove a local folder from the library
Select the Library component.
Right-click the local folder to open the folder context menu.
Click Remove. A dialog box asks you to confirm your decision.
Click OK.
Open, save, or copy a file
Open a file
From the Menu bar (see The SpinFire User Interface), select File > Open Workspace... or click in the Standard toolbar.
In Windows Explorer, navigate to your file folder, select your file, then click the Open button. (You can also simply double-click the file.)
or
You can also open a file by selecting it from the Library or the Recent Documents list on the Home page.
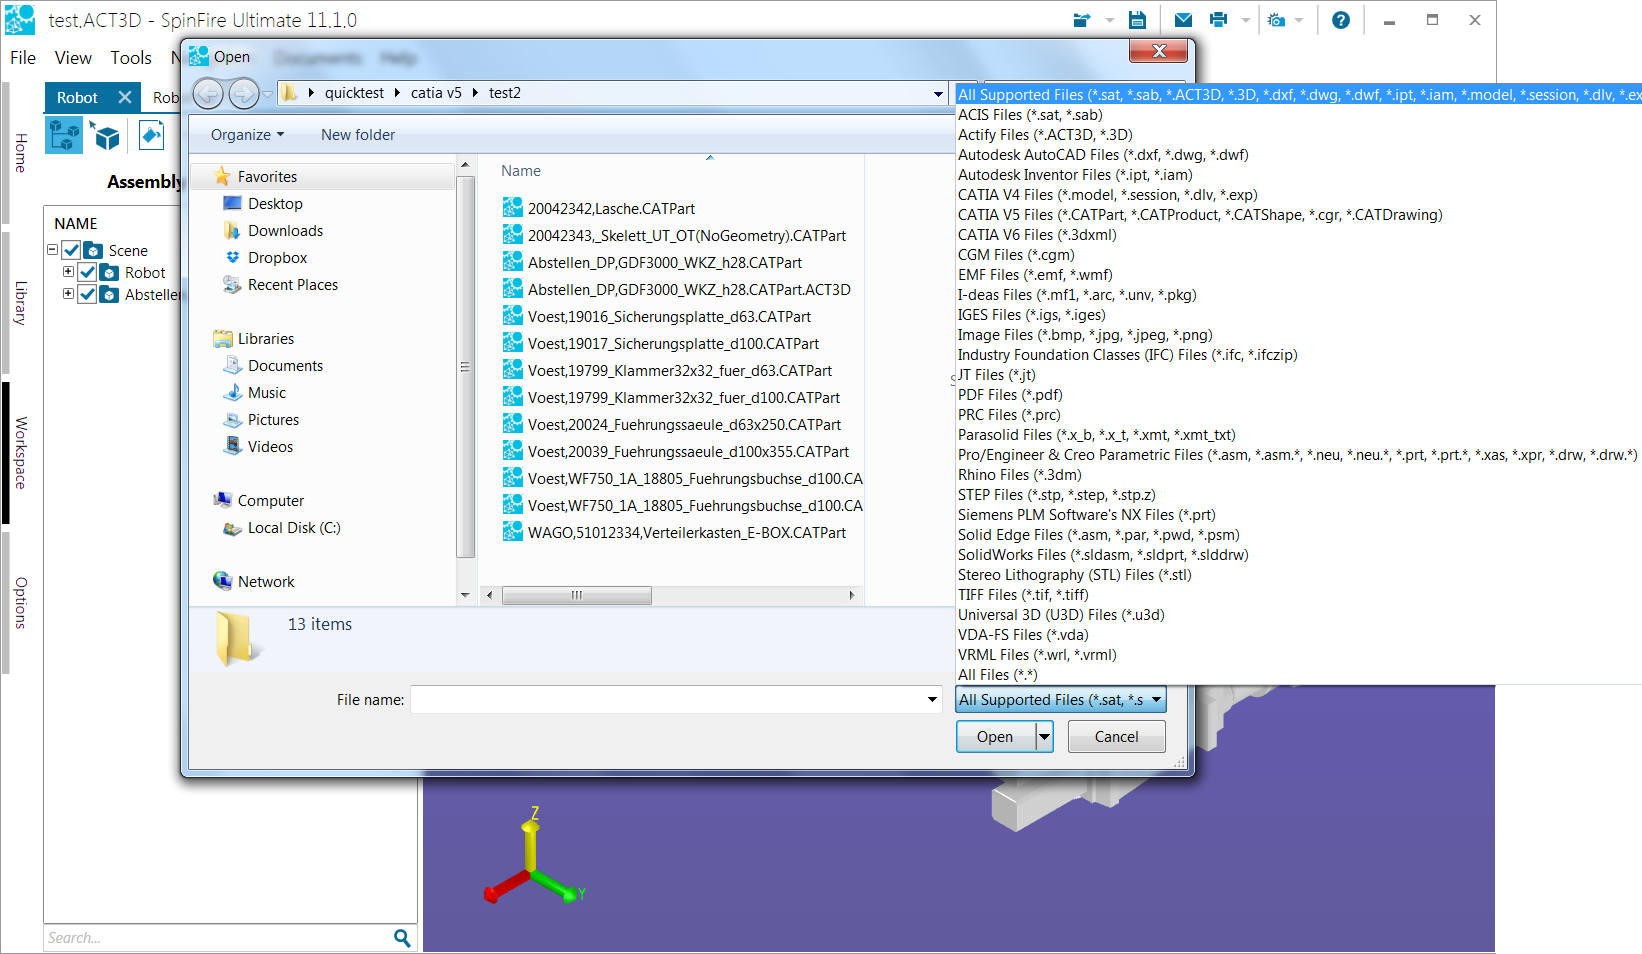
Import a file into the current Workspace
From the Menu bar (see The SpinFire User Interface), select File > Import... to open the file selection dialog box. (In the figure below, note the list of supported file formats.)
From the Open dialog box, select the file you want to incorporate into your Workspace, then click the Open button.
The export procedure is the same for all the file formats listed on the flyout menu; however, each format has a unique export dialog box. (See File Menu Commands > Export.)
Save a model view as an image file
From the Menu bar (see The SpinFire User Interface), select File > Export to open the file formats flyout menu.
Click Image... to open the Export Image dialog box.
Enter the desired width and height of the image. If you want to keep the original image proportions, select the Keep Aspect Ratio checkbox. or If you prefer to choose from a list of preset dimensions, select an option from the Size Type drop-down menu.
Click the […] button to select the desired file location and format. The default format is bitmap (.bmp).
Enable Vectorized for a vectorized image.
Click Save then EXPORT.
Supported export formats are:
Bitmap (.bmp, *.bmp), Enhanced Metafile (.emf, *.emf), Exchangeable Image Format (.exif, *.exif), Graphics Interchange Format (.gif, *.gif), Joint Photographic Experts Group format (.jpeg, *.jpeg), Portable Network Graphics image (.png, *.png), Tagged Image File Format (.tiff, *.tiff), or Windows Metafile (.wmf, *.wmf).
Note
When a 3D document is exported as an EMF, a black-and-white, hidden line vector representation of the scene is saved.
If the cross-section plane is enabled in a 3D document, you can click Save the section profile as an EMF by clicking Section Profile.
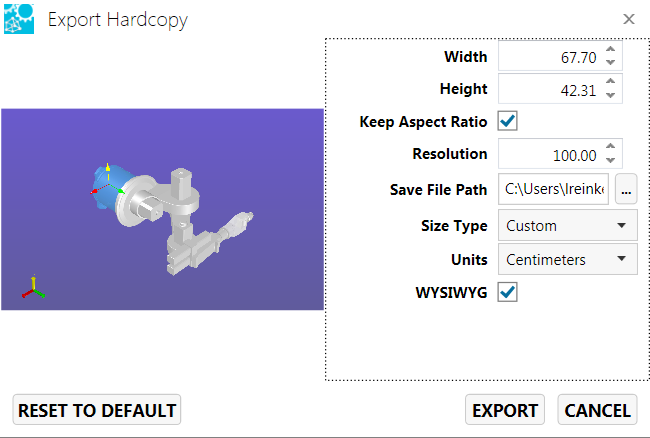
Create a PDF for printing hardcopy
From the Menu bar (see The SpinFire User Interface), select File > Export to open the file formats flyout menu.
Click Hardcopy... to open the Export Hardcopy dialog box.
Enter the desired width and height of the image. If you want to keep the original image proportions, select the Keep Aspect Ratio checkbox.
From the respective drop-down lists, select
Resolution - The greater the resolution, the larger the file
Size Type - Page sizes
Units - Preferred units of measurement
WYSIWYG - Select to include only what is displayed on the screen. Clear to print everything that will fit on the specified page size, even if not visible on the screen.
Click the […] button to navigate to the desired file location.
Click Save then OK.
Note
Use the File > Export > 3D PDF command to take advantage of the Adobe Acrobat Pro Extended features.
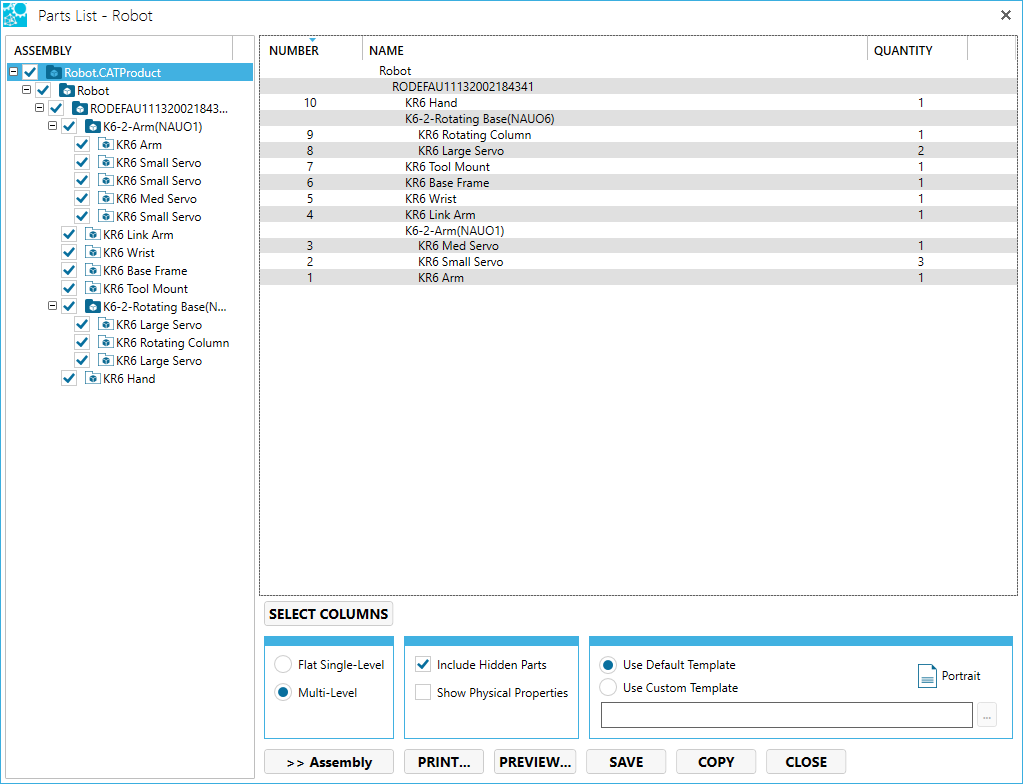
Create an assembly parts list
Note
A parts list is generated only for 3D documents. An active 3D workspace is required to initiate the command. If a 2D drawing or image document is active, the parts list generator is disabled.
To create a parts list for the current .3D file, select File > Export > Parts List.
In the Parts List dialog box, click the desired assembly or subassembly level, then
Choose to create a Flat Single-Level (default) or a Multi-Level list.
Select or clear the Include Hidden Parts and Apply Template checkboxes. (See Using the Templates Editor for information about using templates.)
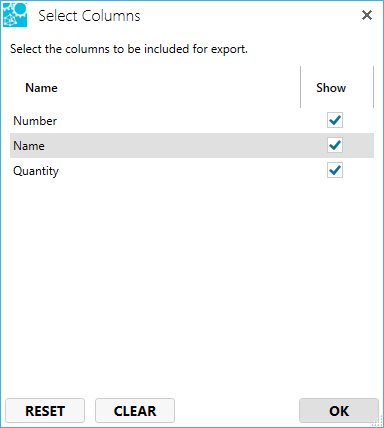
SELECT COLUMNS
Click Select Columns to select which columns of data to view and export.
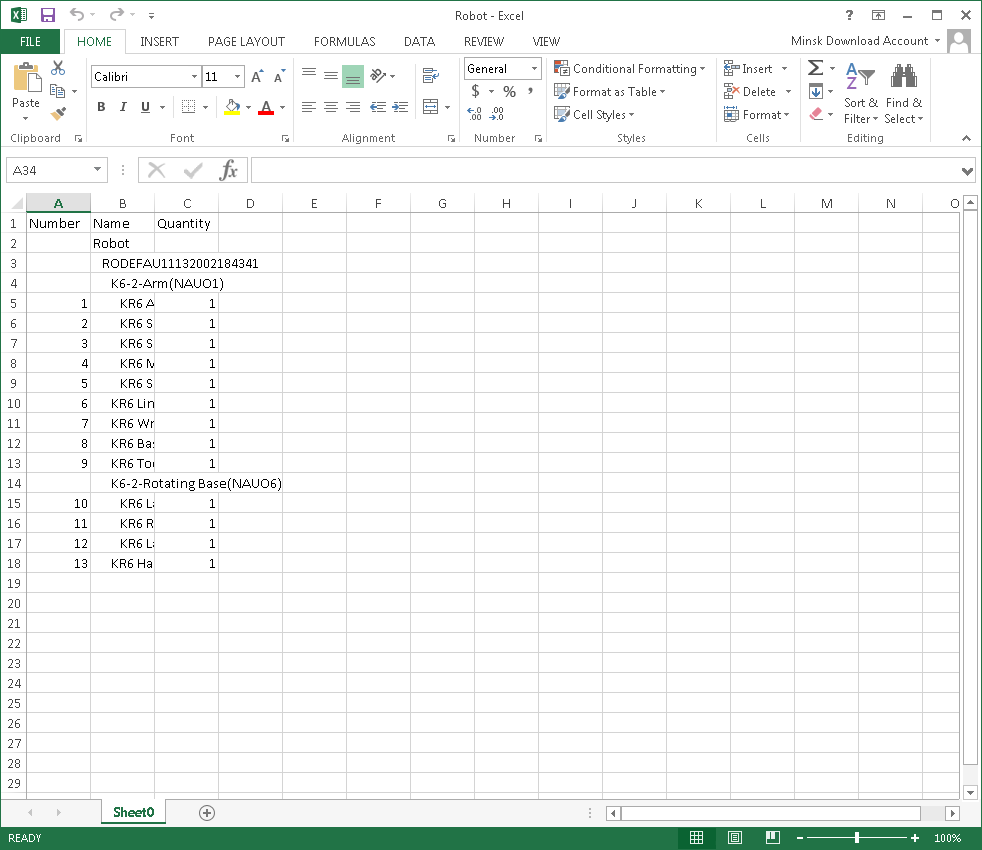
Once you are satisfied with your list, you may choose to print it or save it as a text file. Click one of the following buttons:
Print… - Open the Windows Print dialog box.
Preview… - Review the list before printing.
Save - Save to one of the following file formats: text (*.txt), CSV (*.csv), XML (*.xml), Excel 97 (*.xls), and Excel 2007 (*.xlsx).
Close - Close the Parts List dialog box.
Export to CAD Format
Open a 3D model.
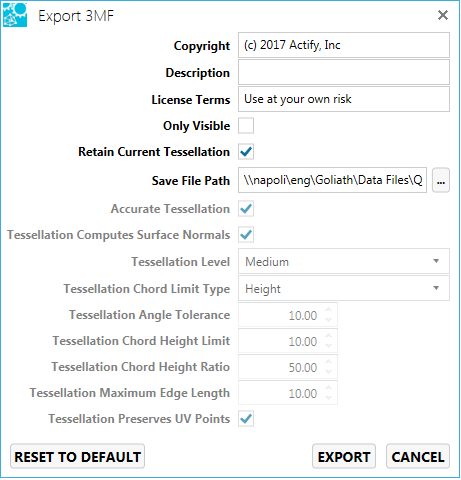
From the Menu bar (see The SpinFire User Interface), select File > Export > (CAD format); selecting the desired CAD format to export. Choose from 3D PDF, 3MF, ACIS, AutoCAD, gITF, HSF, IGES, JT, Parasolid, PRC, STEP, STL, U3D, and VRML.
Change the settings specific to the CAD format exporting to. 3MF format example:
Click Export.
Note: Be sure to examine the Save File Path field to specify the path and file name of the file.
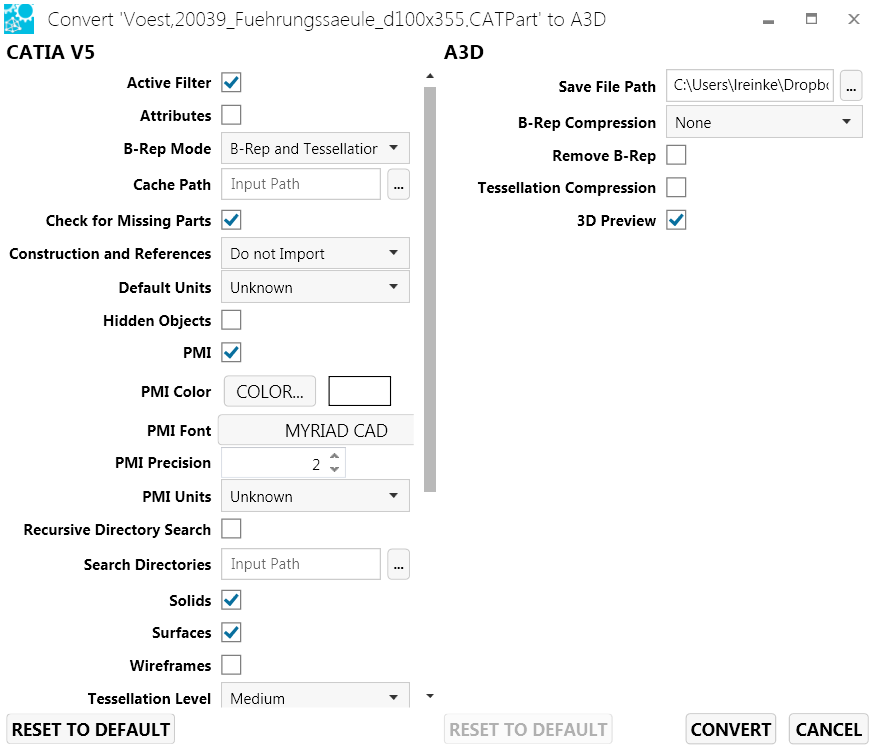
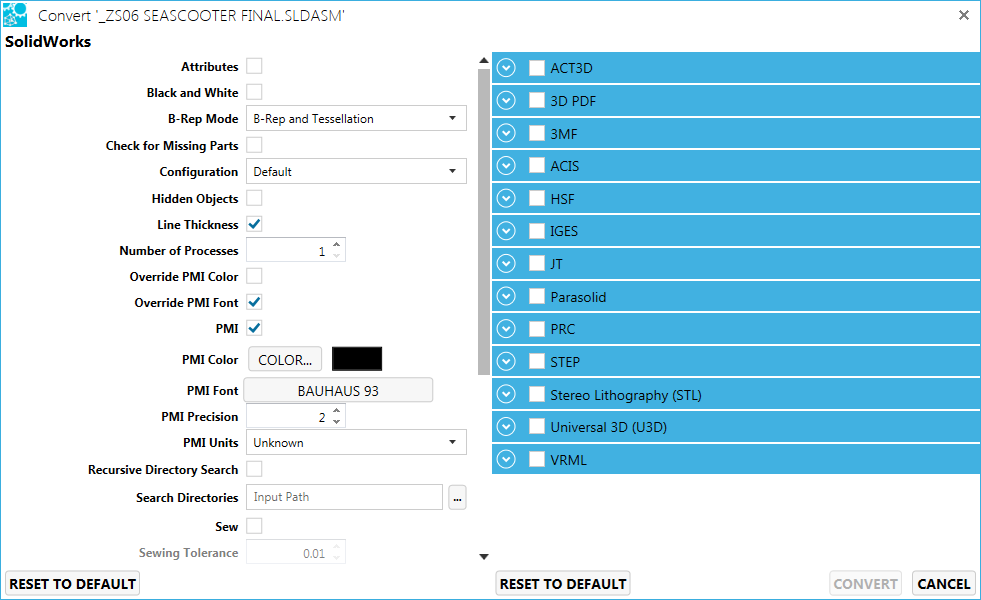
Convert a native CAD file to SpinFire .A3D format
From the Menu bar (see The SpinFire User Interface), select File > Convert to open the CAD to ACT3D... command.
In Windows Explorer, navigate to the appropriate file, then double-click the filename. (Or click the filename once, then click the OPEN button.)
Make necessary adjustments the the default conversion settings, then click the CONVERT button.
A conversion status bar is displayed on the Library page.
When the process is finished, the status is changed to Completed, and the original and output file sizes are displayed.
The Convert dialog window will detect the native CAD format and display the import options on the left side. The right side shows a list of CAD formats (ACT3D, 3D PDF, 3MF, ACIS, gITF, HSF, IGES, JT Parasolid, PRC, STEP, STL, U3D, VRML) where each are expandable to reveal the settings to save to.
Check the file format(s) to convert to.
Set the various settings.
Click Convert.
Go to the Library to view the status of the conversion(s).
Printing
Print a document
From the Menu bar (see The SpinFire User Interface), select File > Print Document… or click in the Standard toolbar.
In the Print Options dialog box, select to use the default print template or a custom template (see Using the Templates Editor).
Click OK.
In the Windows Print dialog box, select the options you want and click Print.
Left mouse drag the red box around the region to print.
The selected region is shown in the Print Preview window.
Note: To change the region, cancel Print Preview and start over.
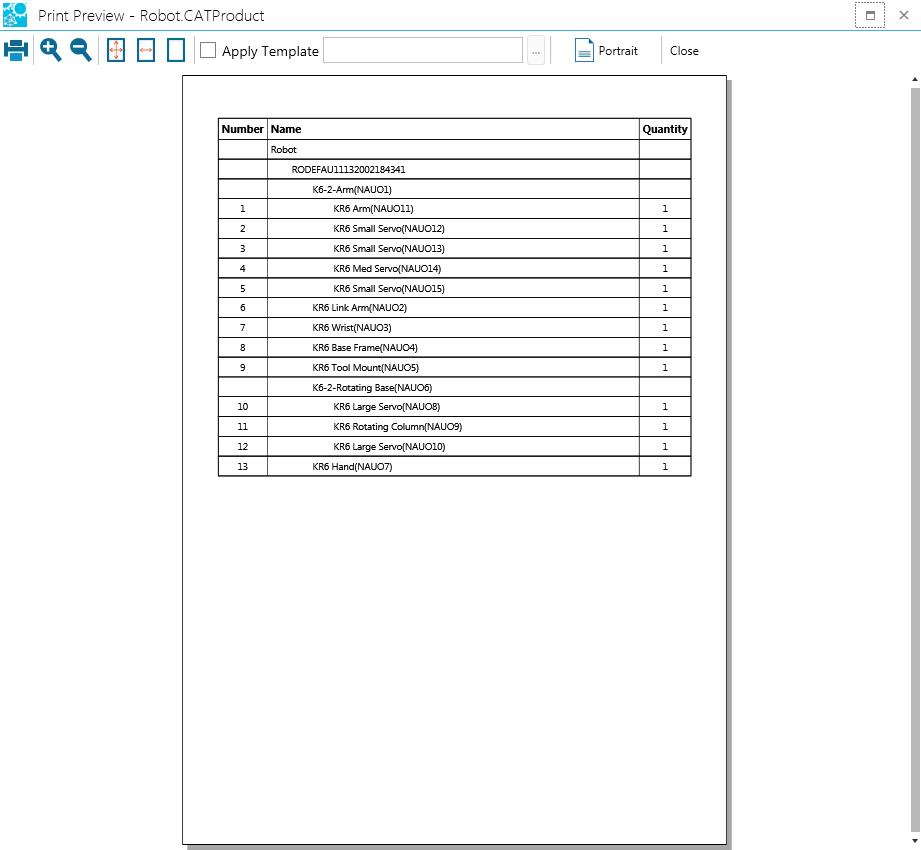
Preview your document before printing
From the Menu bar (see The SpinFire User Interface), select File > Print Preview... to see how your document will look on the printed page.
You can adjust your view to examine the document (using the zoom, Zoom to Default Size, Fit to Width, or Fit to Page icons located in the upper-left of the display. These commands do not alter the way the document is printed.
If you want to use a print template (*.tpl), enter the filename in the Apply Template field. (You can also use the [...] button to navigate to your template.) See Using the Templates Editor.
Enable Vectorized if you wish to print a vectorized image.
Adjust the scale of the image as it appears in the print preview and ultimately your print out by adjusting the scale control.
Click FIT MODEL TO PAGE for SpinFire Ultimate fit the model on the page, moving the camera if necessary.
This automatically turns off the background, coordinate systems, axis triad, navigation cube, grid, ruler, and scale bar. These can be enabled in the More Image Settings controls.
Click FIT VIEW TO PAGE for SpinFire Ultimate to fit the current view of the model and fit it on the page. The camera does not move or change however the view may scale to fit the page.
This automatically turns off the background, coordinate systems, axis triad, navigation cube, grid, ruler, and scale bar. These can be enabled in the More Image Settings controls.
Turn off background color, notes, dimensions, coordinate systems, annotations, axis triad, navigation cube, grid, labels, and the scale bar via the More Image Settings.
Move or nudge the camera in any of eight directions by a configurable distance via the More Camera Settings.
Select Printer and set Printer Properties.
Set the orientation, paper size, and margin widths.
If the view is satisfactory, click the printer icon to open the Windows Print dialog box.
Note that you can toggle between portrait and landscape orientations.
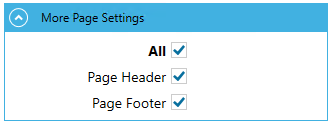
Turn off header and footer information via the More Page Settings.
In the Windows Print dialog box, select the options you want and click Print.
Click X (Close) in the upper-right corner of the SpinFire window.
Note
All documents are closed and the Workspace is cleared. Recently opened documents are listed on the Home page (see Home for an example).
Convert a native CAD file to SpinFire .A3D format
From the Menu bar (see The SpinFire User Interface), select File > Convert to open the CAD to ACT3D... command.
In Windows Explorer, navigate to the appropriate file, then double-click the filename. (Or click the filename once, then click the OPEN button.)
Make necessary adjustments the the default conversion settings, then click the CONVERT button.
A conversion status bar is displayed on the Library page.
When the process is finished, the status is changed to Completed, and the original and output file sizes are displayed.
Adding or removing documents in a Workspace
Add a 3D document to the Workspace
Select Documents > New 3D Document... to add a new 3D document to the current work space.
Note
Once added, importer 3D models from native CAD files or ACT3D files into the new 3D document.
Add a new document to the Workspace
Select Documents > Add Document... to open the Add Document dialog box.
Double-click the file you want to open in the WorkSpace.
Note
If you add a .3D file that contains multiple documents, a dialog box will ask which of the documents in that file you would like to add to the WorkSpace.
When you have multiple documents open in a Workspace, then all those documents will be saved in the .3D file (the one listed in the title bar of the application) when you perform the Save command.
Remove a document from a Workspace
Click the X on the tab of the document you wish to delete from the Workspace.
On the File menu, click Save.
Close a document
To close a particular document, click the X on the tab associated with the document you want to close.
Using Snapshot
Take a snapshot and create a new 2D document:
Ensure that the source 3D document is active in the Workspace. If multiple documents are open, you may need to click the appropriate document tab.
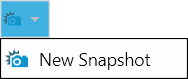
Open the Snapshot menu on the Standard Toolbar.
Click New Snapshot. A new 2D document of the snapshot image is created. If you decide to save the model, the snapshot document will be saved as part of the current workspace.
JavaScript errors detected
Please note, these errors can depend on your browser setup.
If this problem persists, please contact our support.