
PMI Annotations in a 3D File
SpinFire Ultimate can import PMI (Product and Manufacturing Information) from specific native 3D CAD files. PMI is also known as GD&T (Geometric Dimensioning and Tolerancing) or MBD (Model Based Definition).
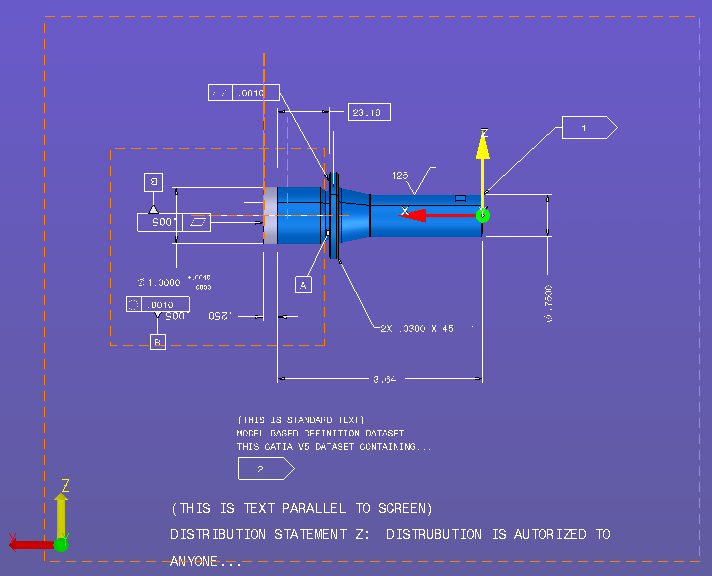
Annotation panes, datums, geometric tolerances, dimensions, and notes can be viewed and changed in the SpinFire Ultimate Workspace. If the Workspace is saved as a .ACT3D file, the PMI is saved along with the file and other annotations.
Listing PMI Annotations
Any PMI annotations in the scene are listed in the Annotation browser pane in the Workspace.
The Annotation Panes in the scene are listed at the top of the pane, followed by the parts in the scene and their associated PMI annotations. The annotations are grouped by type: Datums, Geometric Tolerances, Dimensions, and Notes.
The Description field provides further information about some of the annotations. For example, for Geometric Tolerances, the Description field will display a category, such as Form, Profile, Orientation, Location, or Runout.
Hiding and Showing Annotations in the Scene
The list of annotations in the Annotation pane lets you control their visibility. To hide an annotation, clear the checkbox next to its listing. To show an annotation, select the checkbox next to its listing. You can also hide an annotation by right-clicking it in the 3D scene and selecting Hide.
PMI annotations cannot be deleted.
Note
When hiding an Annotation Plane, you will be hiding only the border of the plane, not the annotations on that plane.
Quick Links
Selecting an Annotation and Viewing related Annotations and Surfaces
When selected, an annotation appears highlighted and associated surfaces (or parts), datums, or feature control frames are also highlighted.
You can select an annotation by clicking either its listing in the Annotation panes or by right-clicking it in the scene.

In this scene both a PMI annotation and the associated surface are highlighted.
Changing Your View to Better Read an Annotation Plane
The View by Plane command positions your view to better read the annotations on an annotation plane.
This command can be called by right-clicking an annotation and selecting View by Plane.
Although the View by Plane command positions your view to better read the annotation, it will not zoom the view in or out. If you want to see the entire plane in the viewport, you may need to use the Zoom Fit command as well.
Auto-Fading for PMI Annotations
The Angle-Fading feature fades the annotations on a plane as the plane gets close to being perpendicular to the screen. By default this setting is turned on, but it may be turned off by changing a setting in the Windows Registry. Angle-fading for annotations and for annotation planes can be set separately.