Skip table of contents

Working with 2D Markups

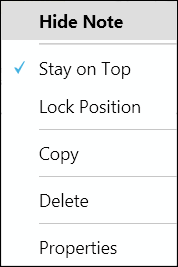
Markup context menus enable you to change the attributes of selected markups; for example, you can change the background color of all linear dimension labels to differentiate them from the radial dimension labels in a particular drawing.

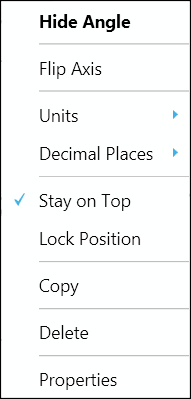
While each type of measurement will have a unique menu, the context menus contain the same basic commands, such as Copy, Delete, and Properties. 

A context menu can be accessed by either clicking on the markup name in the Markups pane or right-clicking the markup itself.
 

Note Context Menu


Distance Measurement Context Menu


Area Measurement Context Menu


Radial Measurements Context Menu


Angle Measurement Context Menu


Common Context Menu Commands

Hide/show a label
  1. Right-click the markup dimension label itself or the name of the label in the Markups browser pane to open the context menu.
  2. Click Hide (or Show) markup name to manage whether or not the label is displayed in the scene.
Set measurement units
  1. Right-click the markup dimension label itself or the name of the label in the Markups browser pane to open the context menu.
  2. Select Units, then click your choice of units on the flyout menu.

Note

Select Display Units on the flyout menu to show/hide measurement units in the label.

Click As Environment in the flyout menu to change the label unit of measurement to the default set in the 3D Viewer Settings page.

Set number of decimal places displayed in the measurement
  1. Right-click the markup dimension label itself or the name of the label in the Markups browser pane to open the context menu.
  2. Select Decimal Places, then click your choice on the flyout menu.
Keep a label in front of the model
  1. Right-click the label itself or the name of the label in the Markups pane to open the context menu.
  2. Click Stay on Top. The Stay on Top setting has a check mark beside it when it is enabled.
Lock a label in position
  1. Right-click the label itself or the name of the label in the Markups pane to open the context menu.
  2. Click Lock Position. The Lock Position setting has a check mark beside it when it is enabled.
Copy the measurement
  1. Right-click the label itself or the name of the label in the Markups pane to open the context menu.
  2. Click Copy on the menu. The measurement is copied to the Windows Clipboard for use elsewhere.
Delete a label
  1. Right-click the label itself or the name of the label in the Markups pane to open the context menu.
  2. Click Delete on the menu. A dialog box asks you to confirm the deletion.

Note

Deleting a note or markup dimension label removes it permanently. If you would rather temporarily hide a label, see "Hide/show a label" on this page.
Properties
Change the font and background used in a label
  1. Right-click the label itself or the name of the label in the Markups pane to open the context menu. (See The SpinFire User Interface and Browsers.)
  2. Click Properties.This opens the markup Properties dialog box.
  3. Click the button that displays the current font name and size.This opens the Font dialog box. (See 2D Viewer Settings.)
  4. Select the desired font settings and click OK.
  5. Click the Background... button to open the Color dialog box.
  6. Select the background color for the label and click OK.

Note

A preview of the selected font and background is shown in the Properties dialog box.

This procedure changes the font of the selected label only.

Change the color of markup arrows and lines
  1. Right-click the label itself or the name of the label in the Markups pane to open the context menu. (See The SpinFire User Interface and Browsers.)
  2. Click Properties. This opens the markup Properties dialog box.
  3. Click the Color... button associated with either Arrow or Line to open the Color dialog box.
  4. Click the desired color and click OK.

Note

This procedure changes the color of the selected label only.
Add a link to a markup label
  1. Right-click the label itself or the name of the label in the Markups pane to open the context menu. (See The SpinFire User Interface and Browsers.)
  2. Click Properties.This opens the markup Properties dialog box
  3. Click in the Hyperlink box.
  4. Type the path of the Web page or file you want to link to, or click the folder icon to browse to a local file.
  5. Click OK. The text of the label should be underlined.

Note

Examples of valid link paths include:

To link to a user view, type the pound sign (#) followed by the name of the saved view.

To link to another document within the .3D file, surround the name of the document with square brackets [ ]. For example, typing [Wheel] would open the Wheel document.

If you would like to link a user view within a 3D document, add the pound sign # followed by the viewname. For example, typing [Wheel]#view2 would open the Wheel document and display the view named view2.

SpinFire Ultimate will append the http:// protocol header to any relative link. Therefore, links to files must use an absolute path.

Add or edit a description or comment

To add or edit a description

  1. Right-click the label itself or the name of the label in the Markups browser pane to open the context menu. (See The SpinFire User Interface and Browsers.)
  2. Click Properties.This opens the markup Properties dialog box.
  3. Click in the Description box and type a description.
  4. Click OK. The description will appear on the label beneath the original measurement or note.

To add or edit a comment

  1. Right-click the label itself or the name of the label in the Markups pane to open the context menu. (See The SpinFire User Interface and Browsers.)
  2. Click Properties. This opens the markup Properties dialog box.
  3. Click in the Comments box and type your comment.
  4. Click OK. A mark will appear in the lower-right corner of the label, indicating the presence of a comment.


Special Context Menu Commands

Length and Distance Markups: Axis

Show or hide the measurement along a specified axis.

  1. Right-click the label itself or the name of the label in the Markups browser pane to open the context menu. (See The SpinFire User Interface and Browsers.)
  2. Select which measurement(s) to include in the markup. Choices are measurements with respect to the Normal, X-Axis, Y-Axis, Centerline, or All.
Radial Markups: Display

To show or hide the arc drawing

  1. Right-click the label itself or the name of the label in the Markups browser pane to open the context menu. (See The SpinFire User Interface and Browsers.)
  2. Select Draw Arc.

To show or hide arc measurements

  1. Right-click the label itself or the name of the label in the Markups browser pane to open the context menu. (See The SpinFire User Interface and Browsers.)
  2. Mouse over Display to see the flyout menu.
  3. Select which measurement(s) to include in the markup. Choices are Arc Diameter, Arc Radius, Arc Length, or All.
Angular Markups: Flip Axis

Flip the measurement axis 180 degrees.

  1. Right-click the label itself or the name of the label in the Markups browser pane to open the context menu. (See The SpinFire User Interface and Browsers.)
  2. Click Flip Axis.


JavaScript errors detected

Please note, these errors can depend on your browser setup.

If this problem persists, please contact our support.