
Working with Coordinate Systems
New coordinate systems
- Select the Markups browser pane in the Workspace. (See the SpinFire Ultimate User Interface and Browsers.)
- Right-click Coordinate Systems to open the Coordinate Systems context menu.
- Click New Coordinate System to open the Coordinate System dialog box.
- In the Name field, type a name for the coordinate system.
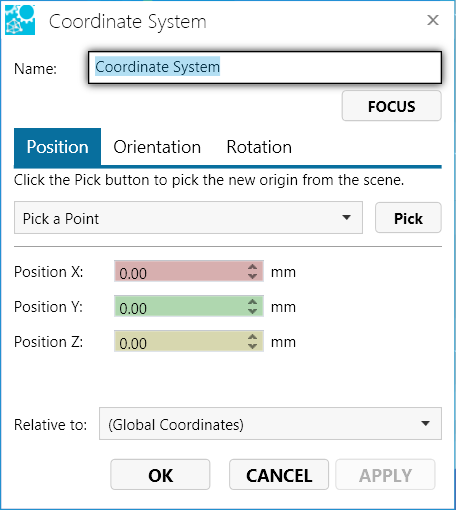
- Use the Position page to set the origin point. (See "Position a coordinate system" on this page.)
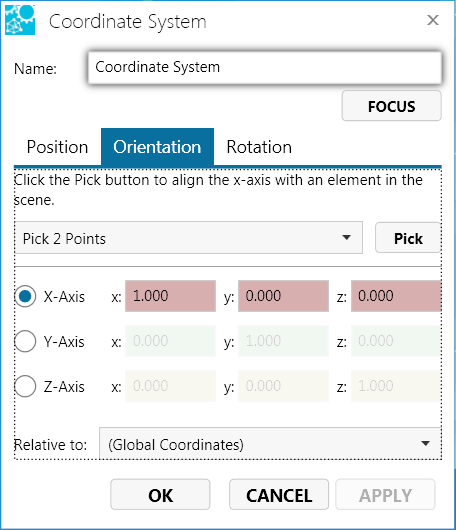
- Use the Orientation page to align the y-axis with an element in the scene. (See "Orient a coordinate system" on this page.)
- Use the Rotation page to rotate the coordinate system about a selected axis. (See "Rotate a coordinate system around an axis" on this page.)
- Click OK to save the new coordinate system.
Related Topics
Coordinate Systems in a 3D Scene
Using Multiple Coordinate Systems
The coordinate system context menu
- Open the Markups pane in the Workspace. (See the SpinFire Ultimate User Interface and Browsers.) All coordinate systems are listed.
Right-click the coordinate system you want to make active.This can be done from either the Markups tab or the 3D scene.
- From the coordinate system context menu, select Active Coordinate System.
Note
A dimension markup takes its measurement with respect to the coordinate system that is active at the time the markup is created. When the active coordinate system changes, the dimension label will not change—it will still display the measurement with respect to the coordinate system that was active when the dimension was created.- Right-click a coordinate system.This may be done either in the Markups pane or in the scene.
- Select Focus.
- The origin point of a coordinate system is placed in the center of your view.
Note
You can also find the Focus command on the Coordinate System properties dialog box.
- Open the Markups pane in the Workspace. (See the SpinFire Ultimate User Interface and Browsers.) All coordinate systems are listed.
- Right-click the coordinate system you want to delete. This can be done from either the Markups tab or in the 3D scene.
- Click Delete. A dialog box will ask you to confirm.
Note
The Global Coordinate System cannot be deleted.
- Open the Markups pane in the Workspace. (See the SpinFire Ultimate User Interface and Browsers.) All coordinate systems are listed.
- Right-click the coordinate system and select Properties to open the Coordinate System dialog box.
- In the Name field, type the new name.
- Click OK.
Note
The Global Coordinate System cannot be renamed.
Properties
- Right-click the coordinate system (in the Markups pane or the frame in the 3D scene).
- Select Properties to open the Coordinate System dialog box.
- Select the Orientation tab.
- Click the appropriate radio button to select an axis around which the coordinate system will rotate.
- Choose one of the five methods shown below to set the orientation of the axis:
a. Select a point in the 3D scene:
- Pick 2 Points - Select two available points on the model. The axis direction will be toward the first point picked. Red dots designate available points on the model. Crosshairs indicate when the pointer is properly positioned over a point.
- Pick 3 Points (Normal Plane) - Pick three points to define a plane.
- Pick Normal on Surface - The axis will be oriented to the normal vector of the selected surface.
- Pick an Edge - Select an edge on the model. The edge is highlighted when the pointer is properly positioned for selection.
- Pick Another Coordinate System Axis - Click the axis of another coordinate system in the scene.
Note
If the method you would like to select is already visible in the drop-down menu, you may simply click the Pick button.
The Pick button should appear pressed in before you pick an element in the scene.
Click the desired location in the 3D scene.
Click OK to save the orientation and close the dialog box.
or
b. Enter vector values in the dialog box:
- From the Relative to drop-down menu, choose the coordinate system you would like the vector to be relative to
- Enter values in the x, y, and z fields next to the selected axis.
- Click Apply. If necessary, you can change the values and click Apply again.
- When you are satisfied with the results, click OK to save the orientation and close the dialog box.
Note
You may cancel a Pick operation by pressing the Esc key.
The Global Coordinate System cannot be re-oriented
- Right-click the coordinate system (in the Markups pane or the frame in the 3D scene).
- Select Properties to open the Coordinate System dialog box.
- Select the Position tab. (The default selection.)
- Choose one of the two methods shown below to set the orientation of the axis:
a. Select a point in the 3D scene:
- Pick a Point - Select an available point on the model. Red dots designate available points on the model. Crosshairs indicate when the pointer is properly positioned over a point.
- Pick a Circle - Select a circle on the model. The circle/arc is highlighted when the pointer is properly positioned for selection. The origin will be set to the circle's center point.
Note
If the method you would like to select is already visible in the drop-down menu, you may simply click the Pick button.
The Pick button should appear pressed in before you pick an element in the scene.
Click the desired location in the 3D scene.
Click OK to save the orientation and close the dialog box.
or
b. Offsetting the origin with respect to another coordinate system:
- Select a coordinate system from the Relative to drop-down menu. The origin point of the new coordinate system will be offset relative to the origin point of the coordinate system in the Relative To field.
- Enter the number of units you want the origin point offset in the Position X, Position Y, and Position Z fields.
- Click Apply. If necessary, you can change the values and click Apply again.
- When you are satisfied with the results, click OK to save the orientation and close the dialog box.
Note
You may cancel a Pick operation by pressing the Esc key.
The Global Coordinate System cannot be re-oriented
- Open the Markups pane in the Workspace. (See the SpinFire Ultimate User Interface and Browsers.) All coordinate systems are listed.
- Right-click the coordinate system.
- Click Properties to open the Coordinate System dialog box.
- Click the Rotation tab.
- Select an axis around which the coordinate system will rotate.
- In the Rotation value field, enter the number of degrees you want the coordinate system to rotate.
- Click Apply. If necessary, you can change the values and click Apply again.
- When you are satisfied with the results, click OK to save the orientation and close the dialog box.
